Monday, August 26, 2013

Herringbone...will you marry me?

Have you noticed that the herringbone pattern is everywhere? It's never really gone out of style. It's classic, yet contemporary.  We needed to have our kitchen backsplash replaced and I knew the herringbone pattern would definitely be going up on those walls. Here are a few ways to use the pattern that are totally swoon worthy...

Aren't these floors pretty?                                           Herringbone on it's side...


 Love this floor inlay...

 My friend Martha inspired me to switch up the standard subway tile brick pattern for herringbone.  She did her kitchen backsplash with white subway tiles and black grout. It looks totally fab and I thought for sure I would have our tiler do white subway tiles and grey grout.  However, you know me and my love for white. At the last minute, I decided to do white grout instead of the grey. Call me boring but I felt like the grey would over power the tiny space as well as take over from the counter tops. Plus, I just love the pure white look. So, here it is. It's subtle, classy, fresh.fabulous.sophisticated and we love it. I'm sorry for the boring photos. Since I've been summer lovin' it up at the cottage I haven't been stylin' the kitchen.  Don't worry, Fall is around the corner and I'll be happy to get back in the house to make it pretty.

This is what it looked like before...subway tile, classic brick pattern.

We would have kept it but remember when we had the quartz counter top installed? There was a gap...grr.

Going up...just needs a little grout...
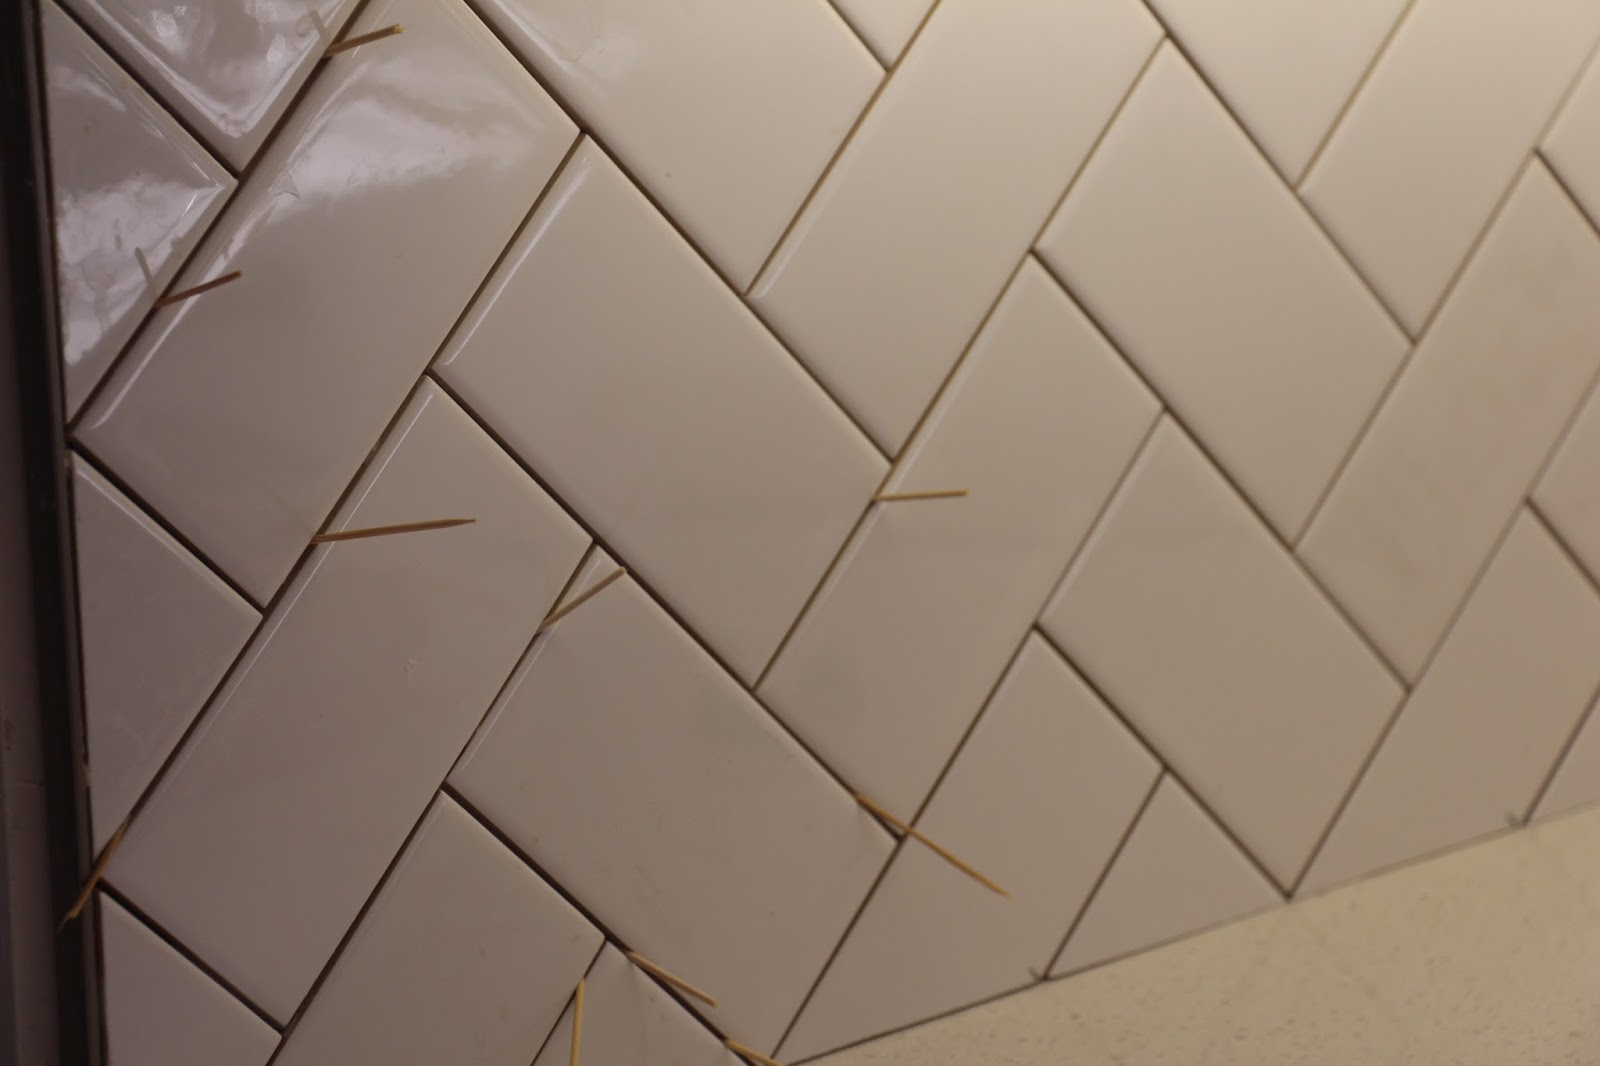
 Some space with tiling spacers, our tiler does it with toothpicks.  Great idea!


Voila!


If you need a tiler, we have a fantastic one that we'll share ;)  Why not spruce up your backsplash in the kitchen or re-tile around your shower or bathroom floor in the ever so classic herringbone pattern.  You know you want to!


Keep it Beautiful.

This post has been linked up with:
Home Stories A to Z


Friday, August 23, 2013

Fabulous Friday! Dresser Facelift - DIY

Hi everyone!

I just finished a little DIY for our baby girl's room. She's our third babe to use this dresser/change table so it needed a little love. Enter in a DIY!

Here is what we started with...

So long knicks....


I wanted to do a two-toned effect so why not use the same pink we painted her bedroom with...
Benjamin Moore - Ballerina Pink
and Benjamin Moore - Cloud White. I love this shade of white.  We have it on all our trim and doors in our house.  It's our go-to.  It's not too stark and has an undertone of blue/grey in it. It's my fav!
 
TIP: It's important when painting furniture to give it a light sanding and use this....
 
*The foam roller is key when painting furniture because it doesn't leave streaks like a paint brush would*
 
 
Adding new hardware is a great way to change the look of furniture.  Hello brass knobs!

 
And here she is, a brand new dresser for our brand new little girl. We decided not to put the cupboard back on and added these grass baskets instead. The lamp from Ikea had to come home with me.  It's girly and fun :)


Painting furniture is a fresh.fabulous.sophisticated way to give it new life.  This project was super fast...a couple hours start to finish MAX! Look around your home, I know you have something that needs love and why not a little hardware!
 
Have a great weekend!
 
Keep it Beautiful.


This post has been linked up with Serenity Now

Thursday, August 22, 2013

Back to School - Say Goodbye to the Lost and Found!

Can you believe it? It's that time again? September is around the corner and the kiddies are going BACK-TO-SCHOOL!  I'm still hanging on to summer but I need to start getting my little guys ready for their big first days. 

I was very excited when Stuck on You sent me their adorable personalized labels to get the kids organized and back to school.  How many jackets, water bottles, gloves etc. have you pulled out of the school's lost and found? Your kids belongings won't be hanging out on the mountain of lost stuff if you have these fab labels.

Stuck on You


Stuck on You has colourful, waterproof personalized labels for your little ones that pretty much stick on anything. These are the labels that Stuck on You sent me. I love the colours and they personalized them with soccer balls for our big guy (sorry the photo is so blurry, I just don't want my kiddies names out there).

Here are just a few items that definitely need labels...

Stuck on You also have these fab lunch boxes...they personalized one for our little guy with his name and these cute dinosaurs. Totally adorable, well made and well insulated.


If you want your kids stuff to stay organized and not end up in another kiddie's backpack then I recommend these adorable labels.  Stuck on You also has great gift ideas, puzzles, clothing etc. Your little ones will love them!


Thanks Stuck on You!

Keep it Beautiful.

Friday, August 16, 2013

Shoppers Drug Mart - 30 Days of Beauty!


30 Days of Beauty

Beauty is in the eye of the beholder! That is why I was thrilled when Shoppers Drug Mart contacted me about their 30 Days of Beauty.  Who doesn't love Shoppers Drug Mart?  Honestly, Mr. Fix-it and I are there at least twice a week. From milk, to diapers to lipstick, Shoppers is one of my favourite destinations.


Who doesn't love a new lip gloss? I know you ladies do! I'm also a sucker for mascara and yummy smelling body creams! I've even gotten Mr. Fix-it using men's body wash (yikes, I hope he doesn't read this post ;)
 
So, 30 Days of Beauty...what does that mean?  Well, first of all it's Shoppers biggest beauty event of the year! Shoppers will be showcasing 30 unique looks for 30 days through videos, instructional "How-Tos" in store and online. There will be tons of one day only and month long offers on fabulous brands like: Clinique, Benefit, Revlon, Biotherm, Quo, Gosh and many more!

 
Oooh and they will have tons of coupons on their website. Visit 30daysofbeauty.ca daily to get your print to redeem in-store coupons that are valid for 1 day only.  Fabuloso!

 
You can check it out by going to their website here for tips and videos or stop in at your local Shoppers and book your 5 minute makeover session.


30 Days of Beauty


Also, don’t forget that from August 24 to 30, if you spend $75 or more on cosmetics, skin care or fragrance, you will receive a free silver cosmetic pouch with 25 beauty and fragrance samples.

 
So whether you love to try all different beauty products or stick to your tried and true, you should check out 30 Days of Beauty because not only do you want your space to feel beautiful, you need to feel beautiful too.

 
Keep it Beautiful.


Wednesday, August 14, 2013

Wednesday Yummies - Gnocchi with Summer Squash

Happy Wednesday everyone!

I have a yummy recipe for you to try. We made this recipe up here at the cottage and it was delish!
The recipe is from Real Simple Magazine. One of my fav mags. We added a few extras to give it a little more love...
Real Simple


What You Need:
  • 1 pound gnocchi, fresh or frozen
  • 1/4 cup olive oil
  • 1-2 yellow squash, cut into 3/4-inch pieces
  • cloves garlic, chopped
  • kosher salt and black pepper
  • 4 ounces Feta, crumbled (about 1 cup) **we used goat cheese instead and added it at the very end to make it extra creamy
  • 1/3 cup torn fresh basil leaves
  • **this is what we added: Chopped onion (sautéed them), broccoli and red pepper

    Here's What You Do:
    1. Cook the gnocchi according to the package directions; drain and return it to the pot.
    2. Meanwhile, heat the oil in a large skillet over medium-high heat. Sautee the onions. Add the squash, garlic, **broccoli, red pepper and ¼ teaspoon each salt and pepper. Cook, tossing occasionally, until crisp-tender, 6 to 8 minutes.
    3. Add the squash to the gnocchi and toss to combine. Serve sprinkled with the Feta (**goat cheese) and basil. Season with pepper
    It really is delicious! We ate it with yummy cheese bread from the bakery. Get-in-my-belly! Its a fresh.fabulous.sophisticated meal that is easy, summery and you'll want seconds.

    Keep it Beautiful.


    Monday, August 12, 2013

    Guest Room Reveal

    Hi everyone! Hope you had a nice weekend :)

    I wanted to show your our new guest room.  It used to be our big guy's room and looked like this...


    This is the feel we wanted...You can check out my post here for the inspiration board info.

    This is what we got...
     

    It may seem strange at the time to purchase two pieces the exact same.  However, I encourage you to try it. It creates cohesion and continuity.

     Remember this desk? You can see what it looked like before here.
     

    I changed up the backing of this desk that had a makeover last year. You can check out that makeover here and you can see how I changed up the backing on the Ottawa Mommy Club website next week.


    I found this chair behind a door at the cottage...it came home with me.


    I bought this headboard at a garage sale for $20.  All it needed was a paint job.

    Voila! From little boys room to a fresh.fabulous.sophisticated space for our guests to feel welcome and cozy in.

    Keep it Beautiful.

    Related Posts Plugin for WordPress, Blogger...