Happy Fabulous Friday everyone!
There are lots of different trends going on in home design right now and stripes are one of them! I've been mentioning in my posts for awhile now that I wanted to paint the front hall and stripe the front enterance. Finally...last weekend I did it! When I told Mr. Fix-it that I wanted to paint stripes on the wall, his face contorted a bit and I could tell that his brain was thinking it would look something like this:
While someone out there loves these stripes, they don't exactly fit with our house. I assured Mr. Fix-it that this was a good idea and that they were going to look great. Here are rooms that I think are really beautiful and full of stripes that were my inspiration:
Also, the front enterance is teeny tiny. It really only fits one or two people in it comfortably. Essentially it houses the front door and a mirror, which then opens up to the hallway. Which means I dont REALLY have to commit to stripes. Here is what it looked like before:
Scuse the creepy face thing in the window...its halloween.
I was really worried about uneven lines and bleeding paint and let me tell you...this project requires lots of TLC. If you are thinking of striping one straight wall, then it will take a couple of hours. But, because I needed to wrap the stripes around the walls, this took mucho measuring and time. It doesn't help that my hundred year old house has uneven walls! If you have a new build, with "presumably" straight walls...stripe on my friends! However, with lots of patience the technique worked and I'm in stripe heaven. They look fabulous!!
Here is how to do it...
Ingredients:
- Two colours of paint (or more depending on how many different coloured stripes you want) (I chose Benjamin Moore Coventry Grey and our trim paint Benjamin Moore Cloud White). The Coventry Grey looks grey/blue in my home with the light. There is lots of contrast between it and the white.
- Painter's Tape: Get the good stuff! I used Frog Tape - Delicate Surface (it worked beautifully!) I picked it up from Home Depot.
- Small paint brush
- Roller X2
- Measuring tape
- Level (this is a must)
- Drop cloth
Directions:
First, I apologize for the lack of picture quality. I
really need a new camera. I think it will be a "
To Alicia, From Alicia, Love Alicia" present under the Christmas tree :) So for now, please bear with me...
#1. Do not do this with attention seeking kids at your feet!
You'll get nowhere! Save this project for naptime!
#2. Paint your room the base colour first (my base was the Coventry Grey).
I painted the front foyer and the hallway so it would flow nicely. Wait for it to completely dry (I waited one full day). This is also a great opportunity to clean up any of those scuffed baseboards too.
#3. Figure out the number of stripes and measure.
Stripe #:
So my wall height is 90 inches and I wanted the stripes to be 9 inches wide. I divided the height of the wall by the number of stripes = 10 stripes.
Measuring:
Start at the top and using your measuring tape, I measured down 9 inches. I did this at three points on the wall. Using a pencil, make a little x. Then take your level and join up the lines across the wall and draw a straight line. Voila, a stripe! Do this all the way down the walls. Mr. Fix-it helped me start it and we thought maybe using chalk would be better...we ditched this idea after the first stripe because the chalk was just too thick. Go with a pencil.
Once you have finished penciling in your lines, tape them.
#4.
Prevent paint leakage between stripes...This is the step that will prevent paint seepage and give you the crisp clean line.
Really push the tape down hard with your thumb to create a tight seal
and take your base colour paint and with a small brush, paint along and slightly over the painters tape where you are going to paint your contrasting colour. Really get it in there. Once it dries it will seal up the tape so your white paint won’t bleed under into the grey and make the stripes all wonky. Wait until this dries.
Once it is dry, then take your contrasting colour (mine is the white) and fill in your stripes. My stripe was wide enough to take the width a regular roller. Do two coats but
don't let the second coat dry...
Sorry for the dark pictures, it was late and the sun had gone to bed!
#5. Pull off the tape while it is still wet.
If you wait until everything is dry, you'll end up pulling off paint. Right after you finish your second coat remove the paint slowly. You'll have straight lines!
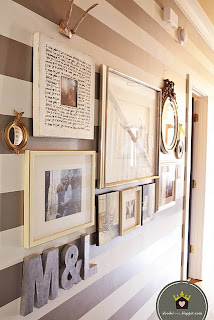
Here is the final reveal. I'm in stripe heaven and Mr. Fix-it loves it too. Phew! He was a big help painting closely to the ceiling (I'm not the cleanest painter when the wall meets the ceiling).
I feel like the hallway has better flow through between the living room and stairs and the stripes add a little bit of decor trend. I stole the silver mirror from above the mantel and put it in the hall. Looks fab!
Hmmm, that mantel is looking bare now...do I feel a mirror shop trip coming up?
Stripes are hot right now and can look fresh.fabulous.sophisticated in your house! Try it out!
Have a great weekend!
Keep it Beautiful.

This post has been linked up with:

and


