
Excited for the weekend? Been a long week? After getting back from vacation, this work week feels like it has crawled by. However, on a fun note...I'll be starting my maternity leave in 4 weeks. Yeah!! Countdown is on.
With the time crunch of baby #3 coming, we have a list of projects that we want to start and finish. The breakfast/kitchen reno and nursery are our top two. So...here's the plan.
Breakfast Room
This is a room off the kitchen that currently holds our kitchen table and a lamp. Yup, that's it. It's a space that is reaching out for some love. This is what it looked like when we bought the house. Yikes!

We needed to say good-bye to the forest green and peeling linoleum floor. So we laid new floor, painted the room Farrow & Ball Pale Powder, added a kitchen table, chairs, drapery and a lamp. It has been the place we eat our breaky and dinner through the week.

It's now time to make better use of the space. Our kitchen is pretty small, so all my platters for entertaining have been hanging out in a moving box in the basement since move-in day. Anytime I've needed them, I dig them out and return them back to the dungeon afterwards. So, why not build storage in the breakfast room to give them a new home?
THE BREAKFAST ROOM PLAN:
- install base cabinets along one of the walls (we bought them from RONA)
- order and install counter top
- Mr. Fix-it build open shelves on top of counter to keep it pretty
- Have the sliding glass door to the deck replaced with french doors (I'm super excited about this part)
- Build a desk
I'll remind you that our kitchen looked like this when we bought the house...yup...brutes!
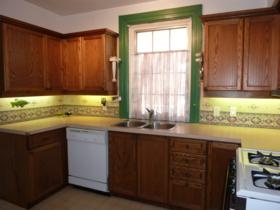
We removed the random fish decal wallpaper, painted the kitchen, replaced the appliances, laid down new hardwood floors, painted out the cabinets and counter top (BTW, this is a great way to spruce up your old counter), added new hardware and drapery (check out my post on DIY NO SEW ROMAN BLINDS). However, we figure while were doing the makeover in the breakfast room, why not order in new counter tops for the kitchen.
Seeing how March 27th is our baby's due date, we're working with some tight timelines. A tip to remember when doing a renovation yourself or with a contractor is, HAVE A SCHEDULE! Life is busy, so having a plan allows you to figure out when you can work on things and when you can't.
Here is what we have planned for the rooms. I tried to make this collage bigger but this is where my techie skills end! I forgot to add that we need a new sink in there too. I'm having a hard time finding one I like. Any suggestions in Ottawa? We're liking either a really deep stainless steel sink with a small side sink or one big stainless farm sink. Hmmmm.

It's going to be a busy weekend but I'm hoping to have a few step-by-step tutorials to share with you as we move ahead!
FYI...I'm now blogging for the Ottawa Mommy Club. Not sure what countertop to choose for your kitchen? Head over to OMC and check out my latest blog...What Countertop To Choose?
Have a great weekend.
Keep it Beautiful.


