Sunday, July 29, 2012

Salads! Salads! Salads!

Remember I told you that Mr. Fix-it and I had a "no-drinking-through-the-week" challenge a couple of weeks ago? Well, last week we did it again BUT we also added another challenge....last week was our summer salad week. Summer is a great time to add lots of fresh flavours to your salad and we decided to have a salad every night as our main course for dinner.

Soooo, I was on the hunt for yummy salad recipes that were not only tasty but that would be filling enough to do as our main. We usually had hearty bread with our salads and one night we added sweet potato fries. YUM!

Here are the salads that we had last week:

Avocado Wasabi Salad
It was delish! I added extra wasabi for more kick!


Buffalo Chicken Salad with Blue Cheese Dressing
Mmmm, this also was really good but I didn't do the blue cheese dressing and subsituted it for caesar instead.


Taco Salad
I love a good taco salad. You can make your own taco bowls but we just made it in a big deep bowl. Yum. You can really add anyting you want to this one...


Ultimate Caesar Salad
YUMMY!


Grilled Romaine with Marinated Cherry and Feta

I didn't love this recipe. I did like the tomatoes but I found the grilled romaine kinda weird and crispy.

So that's that. If you are looking for a yummy salad to add to your dinner menu this week then grab one of these recipes. You're waistline will feel fresh.fabulous.sophisticated and its a great dinner in the summer's heat!

If you have a favourite salad recipe, please share in the post section below!!

Keep it Beautiful.


Twitter: keepitbeautifu1

Friday, July 27, 2012

PHOTO LOVE - LOVE BUNNY

Happy Friday!!

Monday I blogged about how to turn your beautiful photos into a show stopping gallery wall. Today, let's continue to talk photography.

I want to introduce you to a fab local photographer in Ottawa named Christine Melenhorst. Her company is Love Bunny and specializes in maternity.newborn.family.engagement.wedding.boudoir. Christine's work is beautiful. She has a beautiful eye for finding the perfect shot, makes her clients feel at ease and produces gorgeous photos. Here are some of her beautiful photos:

Are you getting married?


Waiting for a new bundle of joy?

Has your bundle arrived?


Do you still have the family photo on your wall from years ago? Are your kids still tiny in it? Is your family complete in it? If you answered yes to any of these questions then take a look at these photos and you'll want to update your own.


If you are looking for a photographer in Ottawa to capture your family's precious moments in life, Christine is your gal and Love Bunny will allow your gallery walls to be fresh.fabulous.sophisticated.

Here is how you can contact Love Bunny:

www.lovebunnyphotography.com
www.lovebunnyweddings.com
http://www.lovebunnyphotography.com/blog

Have a great weekend everyone!

Keep it Beautiful.

Monday, July 23, 2012

A picture is worth 1000 words - Part I

Happy Monday everyone!

Hope you had a great weekend. My mum has been visiting this past week and we did a couple DIYs this weekend that I'll be sharing soon but they're not quite done. ALSO...I attended the Social Capital Conference here in Ottawa. It was a social media conference where I was armed with my business cards and laptop. I met great people in the social media world, learned a ton about blogging, made some great connections and got inspired to grow Keep it Beautiful.

Sooo...lets talk about today's post...

Do you have favourite photos stored on your computer or hanging out on a shelf in a photo album? Its time to get those beautiful photos on your walls to display the people and things in your life that you are most proud of.

A few of you have asked me to do a post on how to arrange photos in your home with a "gallery" feel. So, let's talk tips and tricks on how to make your gallery of beautiful photos shine on your walls.

1. THE PHOTOS

Think about what look you are going for in your gallery? Do you want to display family? friends? a theme (ie: a holiday)? do you want them in B&W? colour? a mixture?

2. FRAMES

If you already have a mix of frames that you want to use, but they happen to be all different colours and sizes, that's okay. My suggestion is to pick up a can of spray paint and spray them all the same colour. Even though the frames are different shapes and sizes, the fact that they are now the same colour will create cohesion. For example:


3. Have a plan

You definitely need a plan. Otherwise, you'll end up with lots of holes in the walls and a mish-mash of chaos.

Do you want all the same size frames? Different sized frames? Will you be mixing the frames with other pieces? Are you hanging the frames on the wall? On a wall shelf? Here is some inspiration...


Here is a great guide for ideas...

A gallery wall up the stairs can be tricky. Here are some ideas! I find that having equal separation between the frames guarantees a fab look!


Here is my stairway gallery that goes up to my third floor...


These are some other gallery walls in my house...


3. Make Templates

THIS IS A VERY IMPORTANT STEP! Essentially, trace your frames onto paper and move them around on your walls until you get the perfect look that you want. Once your frames are in place, you can hammer the nail right through the paper, remove the paper and hang your frame!

Sooo, overall...

take the time to research what style of gallery you are going for, choose your favourite photos, personalize it, make templates, take your time and you will have a fresh.fabulous.sophisticated gallery wall that will make your heart sing every time you walk by!!

Heads UP!! This week I'm hoping to feature a fab local photographer who's photos will make you smile! You'll be wanting to ask her to take your photos for your new gallery wall!

Keep it Beautiful.


Twitter: @keepitbeautifu1

Friday, July 20, 2012

WHAT'S OLD IS NEW

Happy Friday everyone!

I've mentioned before that I lost my Nana in the spring. The last few weeks, my mum and her siblings have been cleaning out Nana's apartment and saying good bye to her things. Really, when you look at what's around your house/apartment, they really are just things. In the grand scheme of life, many of the "things" you surround yourself with don't really matter. However, there are some "things" that were not only special to my Nana but special to people in her life that remind them of Nana.

This is my Nana...wasn't she beautiful? She was a gift to the world and I loved her very much.

So, between Nana's four children, 8 grand-children and 2 great grand-children, everyone received treasures of Nana's that they loved and reminded them of her. We are so lucky. Here are some of Nana's treasures that we are finding special spots in our homes.


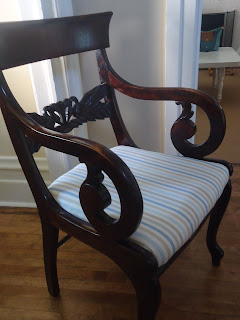
Nana had some beautiful furniture. I love occasional chairs and this one was always a favourite of mine at Nana's house. Its a Victorian Swan Chair. It was my Nana's mum's chair (so we're talking 1800s). LOVE.

All it needed was to be recovered, so yesterday my mum and I did a little DIY...You may remember the White Chair DIY from a couple of months ago.

Here is the chair BEFORE. The wood is gorgeous in it, the lines are beautifuly carved and the swans in the back...J'aime.

BEFORE


Mum and I took off the red fabric and check out the strappings...so old. We looked under the cotton batten and it was stuffed with horse hair and straw! Very cool. Now that's OLD!!


Check out how the chair is held together with the dowells. They dont make them like that anymore.


We took out most of the tacks (see all the holes...clearly this chair had been recovered many times).

We used the red fabric as a guide to measure our new fabric. We happened to be in Ikea a couple of days ago and found this pretty fabric (have you checked out their fabric section? Its fantastic and the prices can't be beat!). This fabric was 8.99/m!! How is that possible?

Here are some tips for recovering a chair cushion.

Iron your fabric and then lay it under the cushion and make sure it straight.


Using your staple gun, pull one side of the fabric taught and staple to the frame of the cushion.

Next, pull the opposite side taught and staple.


Next, you can either do the two other sides or start on the corners. We started on the corners. This can be tricky. You want to make sure that there are no bumps or grooves when you pull it so it takes a bit of folding patience and trial and error. You'll get it!


The cushion fit back on the chair perfectly and VOILA...a fresh.fabulous.sophisticated chair that looks beautiful in my living room and will always remind me of Nana.


What's old is new! Take the time to look at items of the past that may bring back memories and create new ones.

I'll definitely be blogging about some of Nana's other treasures as they find their new homes in my rooms. I have two more chairs that are now in our guest room so they'll need cushion recovers too.

Do you have treasures of family members that you love? I would love for you to share them with me in the comment section.

Dont forget to follow me by clicking "join this site" on the right hand side of the blog.

Have a wonderful weekend! I'll be heading to the Social Capital Conference (a social media conference) this weekend to be inspired and learn more about the blogging world. With business cards in hand I'm ready to network and I'll be sharing it with you throughout the day on TWITTER. Username is: keepitbeautifu1

Keep it Beautiful.

This post has been linked up with:
Weekend Bloggy Reading

Related Posts Plugin for WordPress, Blogger...